<figure class="wp-block-gallery has-nested-images columns-default is-cropped wp-block-gallery-1 is-layout-flex wp-block-gallery-is-layout-flex">
<figure class="wp-block-image size-large"><img data-id="3021" class="wp-image-3021" src="https://flowgenius.in/wp-content/uploads/2025/12/How-to-Use-n8n-to-Integrate-Slack-1024x576.png" alt="" /></figure>
</figure>
<p class="has-text-align-center">How to Use n8n to Integrate Slack</p>
<hr class="wp-block-separator has-alpha-channel-opacity" />
<div class="wp-block-spacer" style="height: 27px;" aria-hidden="true"> </div>
<p>If you’re using Slack every day, you already know the struggle, too many messages, too many alerts, and too many tasks that still need manual updates. Teams spend hours copying data, sending reminders, posting updates, and writing the same notifications again and again.</p>
<p>In this guide, you’ll learn exactly <strong>how to use n8n to integrate Slack</strong> so you can automate messages, alerts, and workflows without any coding. Even if you’ve never used automation tools before, or you’re scared of APIs, this tutorial will walk you step-by-step through everything.</p>
<p>By the end of this guide, you’ll know exactly how to build workflows that automatically send messages, create alerts, update channels, notify team members, and connect Slack to your apps like Notion, Gmail, Google Sheets, GitHub, or any API.</p>
<p><strong>And why does this matter right now?</strong><br />Because in 2025, automation is no longer optional. Companies are replacing interns with workflows, and the people who know how to automate even a small part of their work are the ones who grow the fastest. Learning this today will save you dozens of hours every week.</p>
<div class="wp-block-spacer" style="height: 50px;" aria-hidden="true"> </div>
<h2 class="wp-block-heading"><a id="post-2984-_grrjvku4fopk"></a>WHAT YOU WILL LEARN</h2>
<ul class="wp-block-list" style="padding-right: var(--wp--preset--spacing--60); padding-left: var(--wp--preset--spacing--60);">
<li><a id="post-2984-_ugwgqhe8xulq"></a>How to understand Slack + n8n integration</li>
<li><a id="post-2984-_qasr36kp2jb6"></a>How Slack authentication works</li>
<li><a id="post-2984-_sxoteip4clq4"></a>How to install n8n (Cloud, Desktop, Docker)</li>
<li><a id="post-2984-_qwb9fqtf1k8d"></a>How to set up Slack API credentials</li>
<li><a id="post-2984-_8r9b7sajfhd9"></a>How to create a step-by-step workflow to send Slack messages automatically</li>
<li><a id="post-2984-_6vpopzbxqdk2"></a>How to add triggers (webhooks, schedules, integrations)</li>
<li><a id="post-2984-_xk6kl0ics4dp"></a>How to use advanced Slack nodes and actions</li>
<li><a id="post-2984-_54mqnnndrcp2"></a>How to compare n8n Cloud vs Self-Hosted</li>
<li><a id="post-2984-_ge4rtkq2aoh6"></a>How to explore node details for each step</li>
<li><a id="post-2984-_ny53ybjna4d1"></a>How to use real use-cases to automate tasks instantly</li>
<li><a id="post-2984-_yjwxkqmrm7dr"></a>How to view the final workflow snapshot</li>
<li><a id="post-2984-_y5u7ocz54wbz"></a>How to implement complete code blocks for Docker installation</li>
<li><a id="post-2984-_3ala2muu4yed"></a>How to follow best practices for beginners</li>
</ul>
<div class="wp-block-spacer" style="height: 31px;" aria-hidden="true"> </div>
<hr class="wp-block-separator has-alpha-channel-opacity" />
<div class="wp-block-spacer" style="height: 27px;" aria-hidden="true"> </div>
<h2 class="wp-block-heading"><a id="post-2984-_v2nvgi9cbm02"></a>How to Use n8n to Integrate Slack (Step-by-Step)</h2>
<div class="wp-block-spacer" style="height: 38px;" aria-hidden="true"> </div>
<h3 class="wp-block-heading"><a id="post-2984-_mnwopqo0bnkt"></a>Step 1: Install n8n</h3>
<div class="wp-block-spacer" style="height: 10px;" aria-hidden="true"> </div>
<div class="wp-block-spacer" style="height: 0px;" aria-hidden="true"> </div>
<h4 class="wp-block-heading"><a id="post-2984-_tc07wlodahq8"></a>You can run n8n in three ways:</h4>
<ul class="wp-block-list" style="padding-right: var(--wp--preset--spacing--60); padding-left: var(--wp--preset--spacing--60);">
<li><a id="post-2984-_o0w9v7o40ux4"></a><strong>n8n Cloud</strong> (fastest, easiest)</li>
<li><a id="post-2984-_luw2wvw6sb1t"></a><strong>Desktop App</strong> (single user, free)</li>
<li><a id="post-2984-_an2tjv60lrc6"></a><strong>Docker Self-Hosted</strong> (most control)</li>
</ul>
<div class="wp-block-spacer" style="height: 35px;" aria-hidden="true"> </div>
<h5 class="wp-block-heading"><a id="post-2984-_xin8tywgk2pm"></a>Option A: n8n Cloud (Fastest)</h5>
<pre class="wp-block-code"><code>Just sign up → <a href="https://app.n8n.cloud">https://app.n8n.cloud
</a> No installation needed. Perfect for beginners.</code></pre>
<div class="wp-block-spacer" style="height: 28px;" aria-hidden="true"> </div>
<h5 class="wp-block-heading"><a id="post-2984-_mbapw9x0fmd1"></a>Option B: Desktop App</h5>
<p>Download from the official website and install it like any normal software.</p>
<div class="wp-block-spacer" style="height: 42px;" aria-hidden="true"> </div>
<h5 class="wp-block-heading"><a id="post-2984-_74pbvj1ek8ee"></a>Option C: Docker Installation (Recommended for Developers)<a id="post-2984-_x5e52fsm5m7h"></a></h5>
<pre class="wp-block-code"><code>Use this code:
docker run -it --rm \
-p 5678:5678 \
-v ~/.n8n:/home/node/.n8n \
n8nio/n8n</code></pre>
<div class="wp-block-spacer" style="height: 26px;" aria-hidden="true"> </div>
<h4 class="wp-block-heading"><a id="post-2984-_77zp51202ud9"></a>What this code does:</h4>
<pre class="wp-block-code"><code>-p 5678:5678 → exposes n8n on localhost
-v ~/.n8n → saves your workflows
n8nio/n8n → pulls the official n8n Docker image</code></pre>
<h4 class="wp-block-heading"><a id="post-2984-_u75697f5hfs7"></a><strong>Pro Tip:</strong></h4>
<p>Use Docker if you want full control, scheduling, production setup, or multiple workflows.</p>
<div class="wp-block-spacer" style="height: 34px;" aria-hidden="true"> </div>
<hr class="wp-block-separator has-alpha-channel-opacity" />
<div class="wp-block-spacer" style="height: 28px;" aria-hidden="true"> </div>
<h3 class="wp-block-heading"><a id="post-2984-_9xva0g1637a6"></a>Step 2: Create Slack App & API Credentials</h3>
<p>This part scares beginners, but it’s super simple.</p>
<div class="wp-block-spacer" style="height: 29px;" aria-hidden="true"> </div>
<h4 class="wp-block-heading"><a id="post-2984-_z4wl8z2ub99u"></a>Follow these steps:</h4>
<ol class="wp-block-list" style="padding-right: var(--wp--preset--spacing--60); padding-left: var(--wp--preset--spacing--60);">
<li><a id="post-2984-_jil6tpv8spq2"></a>Go to Slack API: <a href="https://api.slack.com/apps"><mark class="has-inline-color" style="background-color: rgba(0, 0, 0, 0); color: #0693e3;">https://api.slack.com/apps</mark></a></li>
<li><a id="post-2984-_t58xwdnd106b"></a>Click <strong>Create New App</strong></li>
<li><a id="post-2984-_19eampdudx16"></a>Choose <strong>From Scratch</strong></li>
<li><a id="post-2984-_dq7cbu75to5n"></a>Select workspace</li>
<li><a id="post-2984-_52f9lj75lw9p"></a>Go to <strong>OAuth & Permissions</strong></li>
<li><a id="post-2984-_fgu5i22qn1md"></a>Add these scopes:</li>
</ol>
<div class="wp-block-spacer" style="height: 20px;" aria-hidden="true"> </div>
<h4 class="wp-block-heading"><a id="post-2984-_h8u8teefs1bx"></a>Bot Token Scopes</h4>
<ul class="wp-block-list" style="padding-right: var(--wp--preset--spacing--60); padding-left: var(--wp--preset--spacing--60);">
<li><a id="post-2984-_8ck8ayozm4be"></a>chat:write</li>
<li><a id="post-2984-_rcyqavkdzrle"></a>channels:read</li>
<li><a id="post-2984-_qcze17ug91sc"></a>users:read</li>
<li><a id="post-2984-_hohq9ka3cpm"></a>groups:read</li>
<li><a id="post-2984-_6g3241lh7wui"></a>im:write</li>
<li><a id="post-2984-_5d28ng0g28k"></a>Click <strong>Install to Workspace</strong></li>
<li><a id="post-2984-_4qazjmd0tk1c"></a>Copy the <strong>Bot User OAuth Token</strong> (starts with xoxb-)</li>
</ul>
<div class="wp-block-spacer" style="height: 40px;" aria-hidden="true"> </div>
<h4 class="wp-block-heading"><a id="post-2984-_lzrpojgzonpg"></a><strong>Common Mistake:</strong></h4>
<p>People add <em>user token</em> instead of <em>bot token</em>. Always use <strong>bot token</strong>. Before you learn <strong>how to use n8n to integrate Slack</strong>, you need to create a Slack app and connect your bot token.</p>
<div class="wp-block-spacer" style="height: 32px;" aria-hidden="true"> </div>
<hr class="wp-block-separator has-alpha-channel-opacity" />
<div class="wp-block-spacer" style="height: 40px;" aria-hidden="true"> </div>
<h3 class="wp-block-heading"><a id="post-2984-_vm2w5ua2hx8g"></a>Step 3: Connect Slack to n8n</h3>
<h4 class="wp-block-heading"><a id="post-2984-_hx86osorxdap"></a>Inside n8n:</h4>
<ol class="wp-block-list" style="padding-right: var(--wp--preset--spacing--60); padding-left: var(--wp--preset--spacing--60);">
<li><a id="post-2984-_yu8yjuhajs3v"></a>Create a new workflow</li>
<li><a id="post-2984-_idwsgxv5x0km"></a>Add a <strong>Slack node</strong></li>
<li><a id="post-2984-_mr90puv2hdb8"></a>Under “Credentials,” click <strong>Add New</strong></li>
<li><a id="post-2984-_gony8xs8k6s3"></a>Paste your xoxb- token</li>
<li><a id="post-2984-_tdiudepd5h4e"></a>Save</li>
</ol>
<p>That’s it Slack is now integrated with n8n.</p>
<div class="wp-block-spacer" style="height: 27px;" aria-hidden="true"> </div>
<hr class="wp-block-separator has-alpha-channel-opacity" />
<div class="wp-block-spacer" style="height: 37px;" aria-hidden="true"> </div>
<h3 class="wp-block-heading"><a id="post-2984-_jnszc0npl301"></a>Step 4: Build Your First Automated Slack Message</h3>
<p>This is the most basic automation and the one every beginner should start with.</p>
<div class="wp-block-spacer" style="height: 33px;" aria-hidden="true"> </div>
<h4 class="wp-block-heading"><a id="post-2984-_39z575eu6zdb"></a>Step-by-step:</h4>
<ol class="wp-block-list" style="padding-right: var(--wp--preset--spacing--60); padding-left: var(--wp--preset--spacing--60);">
<li><a id="post-2984-_939q0b2d5o7z"></a>Add <strong>Trigger Node</strong></li>
<li><a id="post-2984-_9i6sza95utz9"></a>Choose <strong>Manual Trigger</strong> (for testing)</li>
<li><a id="post-2984-_mo2d8nluvj1q"></a>Add <strong>Slack Node</strong></li>
<li><a id="post-2984-_i5b8lzyvqkoz"></a>Connect the nodes</li>
<li><a id="post-2984-_qoc97f8yzdbh"></a>Click <strong>Execute Workflow</strong></li>
</ol>
<p>If done correctly, you will instantly see a Slack message.</p>
<div class="wp-block-spacer" style="height: 20px;" aria-hidden="true"> </div>
<pre class="wp-block-code"><code><strong>Shortcut Tip:
</strong> Type <strong>@n8n</strong> inside Slack to check bot permissions.</code></pre>
<div class="wp-block-spacer" style="height: 24px;" aria-hidden="true"> </div>
<hr class="wp-block-separator has-alpha-channel-opacity" />
<div class="wp-block-spacer" style="height: 45px;" aria-hidden="true"> </div>
<h3 class="wp-block-heading"><a id="post-2984-_1slsucmghcbz"></a>Step 5: Add Triggers to Automate Slack</h3>
<p>Slack messages become powerful only when triggered by real events. Many beginners are surprised at how simple it is once they understand <strong>how to use n8n to integrate Slack</strong> using triggers like Webhooks or Cron.</p>
<div class="wp-block-spacer" style="height: 26px;" aria-hidden="true"> </div>
<h4 class="wp-block-heading"><a id="post-2984-_t1ozgmvvs08x"></a>Here are the most common triggers:</h4>
<table id="tablepress-5" class="tablepress tablepress-id-5">
<thead>
<tr class="row-1">
<th class="column-1">Trigger Type</th><th class="column-2">Use Case</th><th class="column-3">Why It Matters</th>
</tr>
</thead>
<tbody class="row-striping row-hover">
<tr class="row-2">
<td class="column-1">Webhook</td><td class="column-2">Notify Slack whenever an external event happens</td><td class="column-3">Works with any app</td>
</tr>
<tr class="row-3">
<td class="column-1">Cron (Schedule)</td><td class="column-2">Daily/weekly reminders</td><td class="column-3">No manual effort</td>
</tr>
<tr class="row-4">
<td class="column-1">Email Trigger</td><td class="column-2">Notify Slack when emails arrive</td><td class="column-3">Good for support teams</td>
</tr>
<tr class="row-5">
<td class="column-1">Google Sheets Trigger</td><td class="column-2">Send Slack alert when a new row is added</td><td class="column-3">Automate reports</td>
</tr>
<tr class="row-6">
<td class="column-1">HTTP Request</td><td class="column-2">Trigger from APIs</td><td class="column-3">Best for developers</td>
</tr>
<tr class="row-7">
<td class="column-1"></td><td class="column-2"></td><td class="column-3"></td>
</tr>
</tbody>
</table>
<div class="wp-block-spacer" style="height: 48px;" aria-hidden="true"> </div>
<hr class="wp-block-separator has-alpha-channel-opacity" />
<h3 class="wp-block-heading"><br />Step 6: Example: Slack Notification When a Google Sheet Updates</h3>
<h4 class="wp-block-heading"><a id="post-2984-_ytgb79sloqn5"></a>Setup:</h4>
<ol class="wp-block-list" style="padding-right: var(--wp--preset--spacing--60); padding-left: var(--wp--preset--spacing--60);">
<li><a id="post-2984-_1yyuwo7fpesq"></a>Add <strong>Google Sheets Trigger</strong></li>
<li><a id="post-2984-_aqa05wpqrke8"></a>Select your spreadsheet</li>
<li><a id="post-2984-_88eacthgoapq"></a>Trigger → “On New Row”<a id="post-2984-_jt74qzntqmmi"></a></li>
<li><a id="post-2984-_h4xbmnpiwkfm"></a>Add <strong>Slack Node → Post Message<br /></strong></li>
</ol>
<h4 class="wp-block-heading"><a id="post-2984-_grms9i4ge1po"></a>Use dynamic data:</h4>
<pre class="wp-block-code"><code>Name: {{$json.name}}
Email: {{$json.email}}
Time: {{$json.timestamp}}</code></pre>
<p>This sends formatted Slack messages every time someone enters data.</p>
<div class="wp-block-spacer" style="height: 22px;" aria-hidden="true"> </div>
<h4 class="wp-block-heading"><a id="post-2984-_skiigvfpa9"></a><strong>Why This Matters:</strong></h4>
<p>This removes manual checking and updates perfect for marketing, sales, and support teams.</p>
<div class="wp-block-spacer" style="height: 41px;" aria-hidden="true"> </div>
<hr class="wp-block-separator has-alpha-channel-opacity" />
<div class="wp-block-spacer" style="height: 42px;" aria-hidden="true"> </div>
<h3 class="wp-block-heading"><a id="post-2984-_y3tj5tayjfkg"></a>Step 7: Slack Node Operations Explained</h3>
<h4 class="wp-block-heading"><a id="post-2984-_hwqia2r1pgdv"></a>Slack node has multiple operations:</h4>
<ul class="wp-block-list" style="padding-right: var(--wp--preset--spacing--70); padding-left: var(--wp--preset--spacing--70);">
<li><a id="post-2984-_y5m9p3u9nqa6"></a>Post message</li>
<li><a id="post-2984-_du09d9quhkrd"></a>Update message</li>
<li><a id="post-2984-_4ac3vim7yfrx"></a>Delete message</li>
<li><a id="post-2984-_rap7x4qwr79j"></a>Upload file</li>
<li><a id="post-2984-_lkj264gnmfi8"></a>Send direct message</li>
<li><a id="post-2984-_50a4f9pe6uh4"></a>Join channel</li>
<li><a id="post-2984-_6k4q72y6r8zx"></a>Get channel list</li>
<li><a id="post-2984-_fwbvk9zib1aw"></a>Get user list</li>
</ul>
<div class="wp-block-spacer" style="height: 50px;" aria-hidden="true"> </div>
<h3 class="wp-block-heading"><a id="post-2984-_4s1h86wfjcye"></a>Detailed Node Table</h3>
<table id="tablepress-6" class="tablepress tablepress-id-6">
<thead>
<tr class="row-1">
<th class="column-1">Step</th><th class="column-2">What It Does</th><th class="column-3">Notes</th>
</tr>
</thead>
<tbody class="row-striping row-hover">
<tr class="row-2">
<td class="column-1">Slack → Post Message</td><td class="column-2">Sends a text message</td><td class="column-3">Most used function</td>
</tr>
<tr class="row-3">
<td class="column-1">Slack → Upload File</td><td class="column-2">Sends files, images, logs</td><td class="column-3">Good for reporting</td>
</tr>
<tr class="row-4">
<td class="column-1">Slack → Update Message</td><td class="column-2">Edit previous messages</td><td class="column-3">For live dashboards</td>
</tr>
<tr class="row-5">
<td class="column-1">Slack → Direct Message</td><td class="column-2">Message specific user</td><td class="column-3">Requires user ID</td>
</tr>
</tbody>
</table>
<h4 class="wp-block-heading"> </h4>
<div class="wp-block-spacer" style="height: 13px;" aria-hidden="true"> </div>
<hr class="wp-block-separator has-alpha-channel-opacity" />
<div class="wp-block-spacer" style="height: 38px;" aria-hidden="true"> </div>
<h3 class="wp-block-heading"><a id="post-2984-_y8juosfkcce"></a>Step 8: Formatting Slack Messages (Optional but Useful)</h3>
<div class="wp-block-spacer" style="height: 15px;" aria-hidden="true"> </div>
<h4 class="wp-block-heading"><a id="post-2984-_ret33jqx8ah1"></a>Slack supports Markdown-style formatting:</h4>
<pre class="wp-block-code"><code>*Bold Text*
_Italic Text_
• Bullet 1
• Bullet 2</code></pre>
<div class="wp-block-spacer" style="height: 37px;" aria-hidden="true"> </div>
<h4 class="wp-block-heading"><a id="post-2984-_v2qh97mtfe73"></a>You can also send blocks:</h4>
<pre class="wp-block-code"><code>{
"blocks": [
{
"type": "section",
"text": {
"type": "mrkdwn",
"text": "*New Task Assigned*\nPlease check the details below."
}
}
]
}</code></pre>
<div class="wp-block-spacer" style="height: 18px;" aria-hidden="true"> </div>
<hr class="wp-block-separator has-alpha-channel-opacity" />
<div class="wp-block-spacer" style="height: 31px;" aria-hidden="true"> </div>
<h3 class="wp-block-heading"><a id="post-2984-_ivn4nq9eoda"></a>Step 9: Advanced Automation Examples</h3>
<p>These are optional but extremely powerful.</p>
<div class="wp-block-spacer" style="height: 38px;" aria-hidden="true"> </div>
<h4 class="wp-block-heading"><a id="post-2984-_pq3rjal5y58f"></a>A. Auto-Send Error Alerts</h4>
<ul class="wp-block-list" style="padding-right: var(--wp--preset--spacing--60); padding-left: var(--wp--preset--spacing--60);">
<li><a id="post-2984-_njb71gcxvmqt"></a>Use an <strong>IF node</strong>:<br />If API fails → Send Slack alert.</li>
</ul>
<h4 class="wp-block-heading"><a id="post-2984-_egydm0kzo8as"></a>B. Auto-Notify When New GitHub Issue Is Created</h4>
<ul class="wp-block-list" style="padding-right: var(--wp--preset--spacing--60); padding-left: var(--wp--preset--spacing--60);">
<li><a id="post-2984-_fesm2h7g6aq6"></a>GitHub → Issue Created → Slack</li>
</ul>
<h4 class="wp-block-heading"><a id="post-2984-_zcglcwtas2qh"></a>C. Auto-message yourself daily with a summary report</h4>
<ul class="wp-block-list" style="padding-right: var(--wp--preset--spacing--60); padding-left: var(--wp--preset--spacing--60);">
<li>Cron -> Slack</li>
</ul>
<h4 class="wp-block-heading"><a id="post-2984-_d8s2mrxhjm72"></a>D. Auto-forward form submissions</h4>
<ul class="wp-block-list" style="padding-right: var(--wp--preset--spacing--60); padding-left: var(--wp--preset--spacing--60);">
<li><a id="post-2984-_xkt38mkdbjbz"></a>Webhook → Slack</li>
</ul>
<h4 class="wp-block-heading"><a id="post-2984-_4p7u0eoukg00"></a>E. Auto-post to Slack when your website gets traffic spikes</h4>
<ul class="wp-block-list" style="padding-right: var(--wp--preset--spacing--60); padding-left: var(--wp--preset--spacing--60);">
<li><a id="post-2984-_6twxgz5t33nq"></a>Analytics → Slack</li>
</ul>
<div class="wp-block-spacer" style="height: 36px;" aria-hidden="true"> </div>
<h2 class="wp-block-heading"><a id="post-2984-_6vzd6q2q8645"></a>Comparison Table: n8n Cloud vs Self-Hosted</h2>
<table id="tablepress-8" class="tablepress tablepress-id-8">
<thead>
<tr class="row-1">
<th class="column-1">Feature</th><th class="column-2">n8n Cloud</th><th class="column-3">Self-Hosted (Docker)</th>
</tr>
</thead>
<tbody class="row-striping row-hover">
<tr class="row-2">
<td class="column-1">Setup Time</td><td class="column-2">2 minutes</td><td class="column-3">10–15 minutes</td>
</tr>
<tr class="row-3">
<td class="column-1">Control</td><td class="column-2">Medium</td><td class="column-3">Full</td>
</tr>
<tr class="row-4">
<td class="column-1">Cost</td><td class="column-2">Starts cheap</td><td class="column-3">Depends on server</td>
</tr>
<tr class="row-5">
<td class="column-1">API Limits</td><td class="column-2">Higher</td><td class="column-3">Unlimited</td>
</tr>
<tr class="row-6">
<td class="column-1">Updates</td><td class="column-2">Automatic</td><td class="column-3">Manual</td>
</tr>
<tr class="row-7">
<td class="column-1">Use Case</td><td class="column-2">Beginners, businesses</td><td class="column-3">Developers, automation pros</td>
</tr>
</tbody>
</table>
<div class="wp-block-spacer" style="height: 47px;" aria-hidden="true"> </div>
<hr class="wp-block-separator has-alpha-channel-opacity" />
<div class="wp-block-spacer" style="height: 24px;" aria-hidden="true"> </div>
<h2 class="wp-block-heading">REAL USE-CASES:</h2>
<div class="wp-block-spacer" style="height: 31px;" aria-hidden="true"> </div>
<h4 class="wp-block-heading has-text-align-left">1. Slack Sales Alerts</h4>
<h6 class="wp-block-heading has-text-align-left"><a id="post-2984-_wrt13wktb32r"></a>New lead → sent to Slack instantly so sales team responds faster.<mark class="has-inline-color" style="background-color: rgba(0, 0, 0, 0); color: #00d084;"> </mark><a href="https://zapier.com/blog/best-automations-for-slack/" data-type="link" data-id="https://zapier.com/blog/best-automations-for-slack/"><mark class="has-inline-color" style="background-color: rgba(0, 0, 0, 0); color: #00d084;">(Click Here)</mark></a></h6>
<h4 class="wp-block-heading has-text-align-left"><a id="post-2984-_mdlh92amphf5"></a>2. Daily Task Summary</h4>
<h6 class="wp-block-heading has-text-align-left"><a id="post-2984-_v99fp5uau38v"></a>Every morning n8n sends you all pending tasks collected from Notion, Sheets, and Trello. <a href="https://slack.com/intl/en-in/integrations"><mark class="has-inline-color" style="background-color: rgba(0, 0, 0, 0); color: #00d084;">(Click here)</mark></a></h6>
<h4 class="wp-block-heading has-text-align-left"><a id="post-2984-_j6hweeelt70o"></a>3. Website Form → Slack</h4>
<h6 class="wp-block-heading has-text-align-left"><a id="post-2984-_4xz0ai5avbto"></a>Visitors submit form → n8n → Slack message with details. <a href="https://slack.com/intl/en-in/integrations"><mark class="has-inline-color" style="background-color: rgba(0, 0, 0, 0); color: #00d084;">(Click here)</mark></a></h6>
<h4 class="wp-block-heading has-text-align-left"><a id="post-2984-_7knmk4cwcq5g"></a>4. GitHub Issue Alerts</h4>
<h6 class="wp-block-heading has-text-align-left"><a id="post-2984-_z36bbva1gxxy"></a>Developers get notified instantly when a new bug is opened. <a href="https://github.com/integrations/slack"><mark class="has-inline-color" style="background-color: rgba(0, 0, 0, 0); color: #00d084;">(Click here)</mark></a></h6>
<h4 class="wp-block-heading has-text-align-left"><a id="post-2984-_pz7oc0jo32fh"></a>5. Error Monitoring</h4>
<h6 class="wp-block-heading has-text-align-left"><a id="post-2984-_um6vre54fwmt"></a>Whenever your API returns 500, n8n sends a Slack warning. <a href="https://hastewire.com/blog/slack-dev-alerts-with-zapier-easy-integration-guide"><mark class="has-inline-color" style="background-color: rgba(0, 0, 0, 0); color: #00d084;">(Click here)</mark></a></h6>
<h4 class="wp-block-heading has-text-align-left"><a id="post-2984-_ujqj0r3vfdbh"></a>6. Content Approval Workflow</h4>
<h6 class="wp-block-heading has-text-align-left"><a id="post-2984-_dtto6x68jnl9"></a>Writer submits draft → Slack message sent to editor. <a href="https://learn.g2.com/ways-to-use-slack-for-automation"><mark class="has-inline-color" style="background-color: rgba(0, 0, 0, 0); color: #00d084;">(Click here)</mark></a></h6>
<div class="wp-block-spacer" style="height: 37px;" aria-hidden="true"> </div>
<hr class="wp-block-separator has-alpha-channel-opacity" />
<div class="wp-block-spacer" style="height: 45px;" aria-hidden="true"> </div>
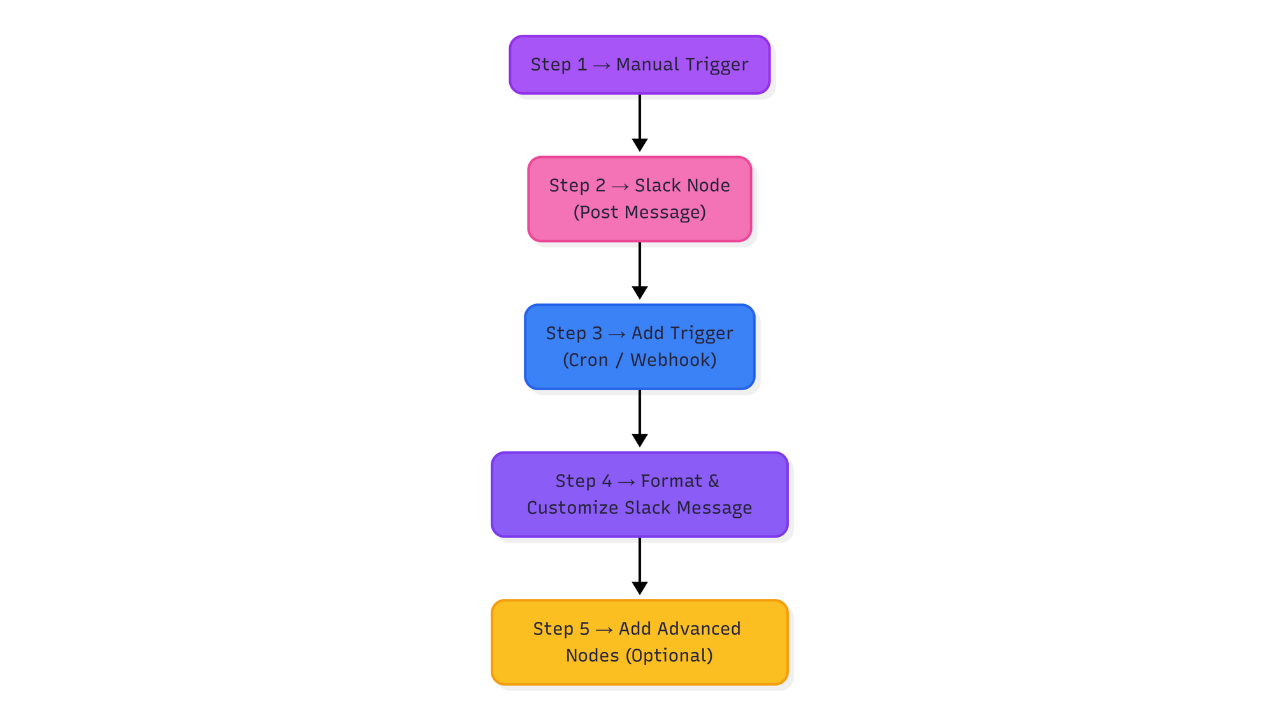
<h2 class="wp-block-heading"><a id="post-2984-_obv4uh4lxdki"></a>WORKFLOW SNAPSHOT</h2>
<p><strong>Step 1 → Manual Trigger<br />Step 2 → Slack Node (Post Message)<br />Step 3 → Add Trigger (Cron / Webhook / Google Sheets)<br />Step 4 → Format & Customize Slack Message<br />Step 5 → Add advanced nodes (optional)</strong></p>
<div class="wp-block-spacer" style="height: 69px;" aria-hidden="true"> </div>
<figure class="wp-block-gallery has-nested-images columns-default is-cropped wp-block-gallery-2 is-layout-flex wp-block-gallery-is-layout-flex">
<figure class="wp-block-image size-full"><img data-id="3003" class="wp-image-3003" src="https://flowgenius.in/wp-content/uploads/2025/12/Workflow-Blog-2.png" alt="" /></figure>
</figure>
<p class="has-text-align-center">Workflow setup in n8n to Integrate Slack</p>
<div class="wp-block-spacer" style="height: 51px;" aria-hidden="true"> </div>
<hr class="wp-block-separator has-alpha-channel-opacity" />
<div class="wp-block-spacer" style="height: 49px;" aria-hidden="true"> </div>
<h2 class="wp-block-heading"><a id="post-2984-_4fq5dckh4moa"></a>CONCLUSION</h2>
<div class="wp-block-spacer" style="height: 32px;" aria-hidden="true"> </div>
<p>You’ve just learned how to integrate Slack with n8n in the simplest way possible. Even if you’re a beginner, setting up Slack automations takes only minutes and once you understand the basics, the possibilities are endless.</p>
<p>Start with a simple message → then add triggers → then connect other apps.</p>
<p>Within a few days, you’ll automate tasks that used to take hours every week. If your goal is real-time automation, knowing <strong>how to use n8n for Slack integration</strong> will help you eliminate manual updates completely.</p>
<pre class="wp-block-code"><code>
<strong>Question</strong>: “What’s the easiest way to learn how to use n8n to integrate Slack?"
<strong>Answer</strong>: “The easiest approach is starting with a basic workflow: a Manual Trigger → Slack ‘Post Message’ node. After that, you can add schedules, webhooks, or Google Sheets triggers.</code></pre>
<div class="wp-block-spacer" style="height: 23px;" aria-hidden="true"> </div>
<p>Your Next Step:<br />Pick one small process in your workflow today and automate it using n8n + Slack. You’ll immediately see the time you save.</p>
<p> </p>
How to Use n8n to Integrate Slack
If you’re using Slack every day, you already know the struggle, too many messages, too many alerts, and too many tasks that still need manual updates. Teams spend hours copying data, sending reminders, posting updates, and writing the same notifications again and again.
In this guide, you’ll learn exactly how to use n8n to integrate Slack so you can automate messages, alerts, and workflows without any coding. Even if you’ve never used automation tools before, or you’re scared of APIs, this tutorial will walk you step-by-step through everything.
By the end of this guide, you’ll know exactly how to build workflows that automatically send messages, create alerts, update channels, notify team members, and connect Slack to your apps like Notion, Gmail, Google Sheets, GitHub, or any API.
And why does this matter right now? Because in 2025, automation is no longer optional. Companies are replacing interns with workflows, and the people who know how to automate even a small part of their work are the ones who grow the fastest. Learning this today will save you dozens of hours every week.
WHAT YOU WILL LEARN
How to understand Slack + n8n integration
How Slack authentication works
How to install n8n (Cloud, Desktop, Docker)
How to set up Slack API credentials
How to create a step-by-step workflow to send Slack messages automatically
How to add triggers (webhooks, schedules, integrations)
How to use advanced Slack nodes and actions
How to compare n8n Cloud vs Self-Hosted
How to explore node details for each step
How to use real use-cases to automate tasks instantly
How to view the final workflow snapshot
How to implement complete code blocks for Docker installation
People add user token instead of bot token. Always use bot token. Before you learn how to use n8n to integrate Slack, you need to create a Slack app and connect your bot token.
Step 3: Connect Slack to n8n
Inside n8n:
Create a new workflow
Add a Slack node
Under “Credentials,” click Add New
Paste your xoxb- token
Save
That’s it Slack is now integrated with n8n.
Step 4: Build Your First Automated Slack Message
This is the most basic automation and the one every beginner should start with.
Step-by-step:
Add Trigger Node
Choose Manual Trigger (for testing)
Add Slack Node
Connect the nodes
Click Execute Workflow
If done correctly, you will instantly see a Slack message.
Shortcut Tip:
 Type @n8n inside Slack to check bot permissions.
Step 5: Add Triggers to Automate Slack
Slack messages become powerful only when triggered by real events. Many beginners are surprised at how simple it is once they understand how to use n8n to integrate Slack using triggers like Webhooks or Cron.
Here are the most common triggers:
Trigger Type
Use Case
Why It Matters
Webhook
Notify Slack whenever an external event happens
Works with any app
Cron (Schedule)
Daily/weekly reminders
No manual effort
Email Trigger
Notify Slack when emails arrive
Good for support teams
Google Sheets Trigger
Send Slack alert when a new row is added
Automate reports
HTTP Request
Trigger from APIs
Best for developers
Step 6: Example: Slack Notification When a Google Sheet Updates
You’ve just learned how to integrate Slack with n8n in the simplest way possible. Even if you’re a beginner, setting up Slack automations takes only minutes and once you understand the basics, the possibilities are endless.
Start with a simple message → then add triggers → then connect other apps.
Within a few days, you’ll automate tasks that used to take hours every week. If your goal is real-time automation, knowing how to use n8n for Slack integration will help you eliminate manual updates completely.
Question: “What’s the easiest way to learn how to use n8n to integrate Slack?"

Answer: “The easiest approach is starting with a basic workflow: a Manual Trigger → Slack ‘Post Message’ node. After that, you can add schedules, webhooks, or Google Sheets triggers.
Your Next Step: Pick one small process in your workflow today and automate it using n8n + Slack. You’ll immediately see the time you save.